Ah, autumn! There’s an undeniable magic in the air when the leaves begin their vibrant dance, and that first crisp chill hints at cozy evenings to come. For me, that enchanting feeling always makes its way into my kitchen, where the intoxicating aroma of simmering homemade caramel becomes the season’s official soundtrack. It’s the delicious prelude to crafting one of fall’s most beloved and iconic treats: Caramel Apples, a true autumnal masterpiece.
More than just a delicious dessert, creating homemade caramel apples is a ritual, a cherished memory in the making that wraps your taste buds in a warm, sweet hug. This isn’t about striving for picture-perfect results (though we’ll certainly aim for delicious!), it’s about embracing the joy of getting a little sticky, experiencing the pure delight of that first glorious bite into a perfectly coated, gloriously sweet and tangy apple. It’s about creating those heartwarming moments that truly define the season.
If you’ve ever dreamt of sinking your teeth into that quintessential autumn treat, brimming with gooey caramel and crisp apple goodness, then welcome, my friend. Let’s make some autumn magic together! And for those who, like me, simply can’t get enough of this incredible flavor pairing, be sure to also check out my Molten Caramel Apple Crumble Cake for another irresistible fall dessert.
Why You’ll Love This Caramel Apples
You’re going to adore this caramel apples recipe because it brings all the joy of a fall festival right into your home, without the sticky fingers of strangers! It’s wonderfully nostalgic, incredibly rewarding, and surprisingly easy to master. The blend of crisp, tart green apple with luscious, chewy caramel is a match made in heaven, and adding your favorite toppings just takes it over the top. It’s perfect for cozy nights in, impressing guests, or simply satisfying that seasonal sweet tooth. Plus, the process itself is a delightful kitchen adventure you’ll want to revisit every autumn.
The Secret to Great Caramel Apples
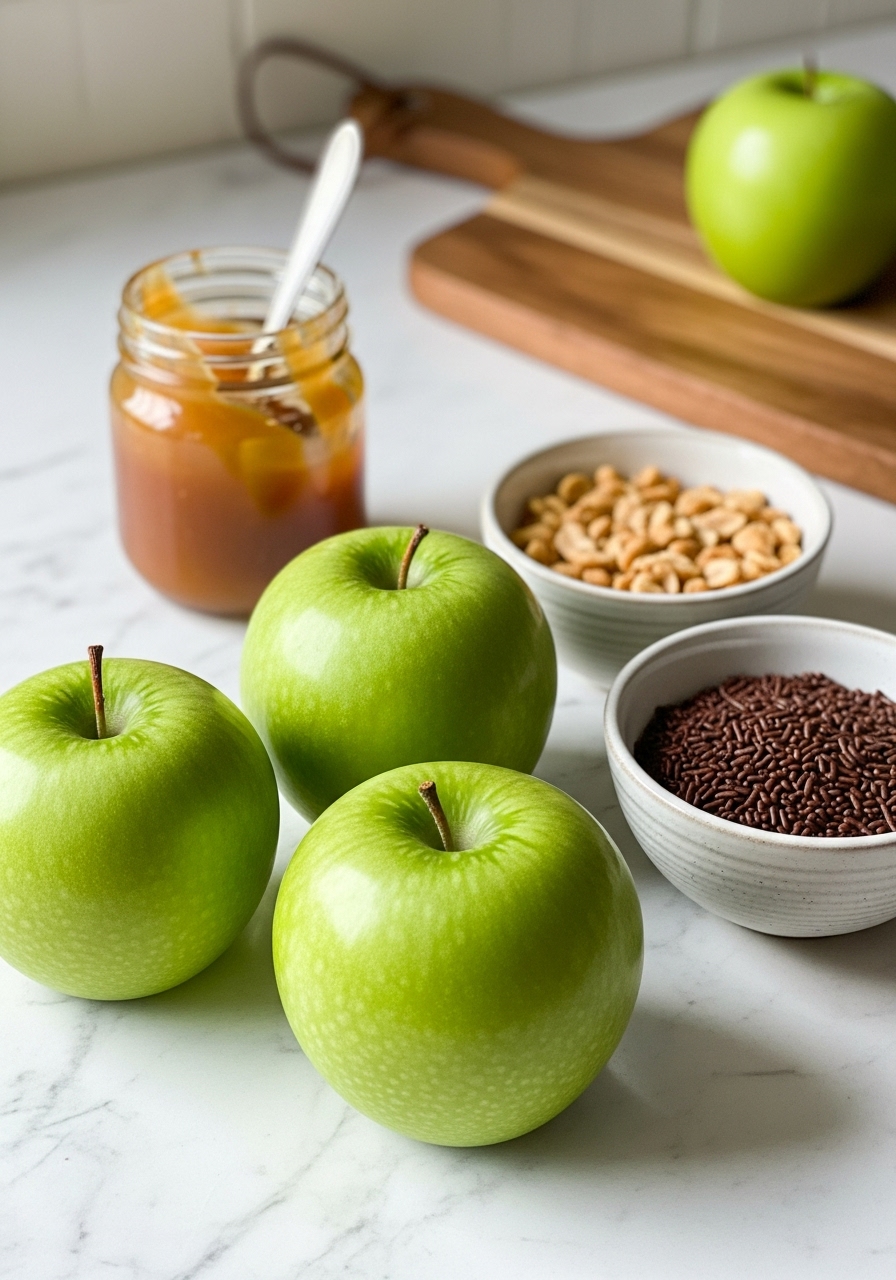
The true secret to truly great caramel apples lies in two key components: the apples themselves and the caramel’s consistency. For the apples, choosing a firm, tart variety like Granny Smith is paramount. Their acidity cuts through the sweetness of the caramel beautifully, preventing it from being cloyingly sweet. As for the caramel, the magic is in reaching the perfect temperature – too low, and it’s runny; too high, and it’s rock hard. A reliable candy thermometer is your best friend here, ensuring that velvety smooth, perfectly chewy coating that clings to every inch of your apple without sliding off.

Pro Tips to Nail It Every Time
To ensure your homemade caramel apples are a smashing success, start by thoroughly washing and drying your apples to remove any waxy coating. A quick dip in boiling water for a few seconds and then drying them well can help caramel stick better. Ensure your wooden sticks are sturdy and inserted firmly, reaching about halfway into the apple. Once coated, don’t let them sit on a flat surface to set; a piece of parchment paper or a silicone mat will prevent sticking. And here’s a fun one: chill your apples *before* dipping, but not so cold that condensation forms. This helps the caramel set faster and adhere beautifully, especially when adding toppings.
Fun Variations to Try
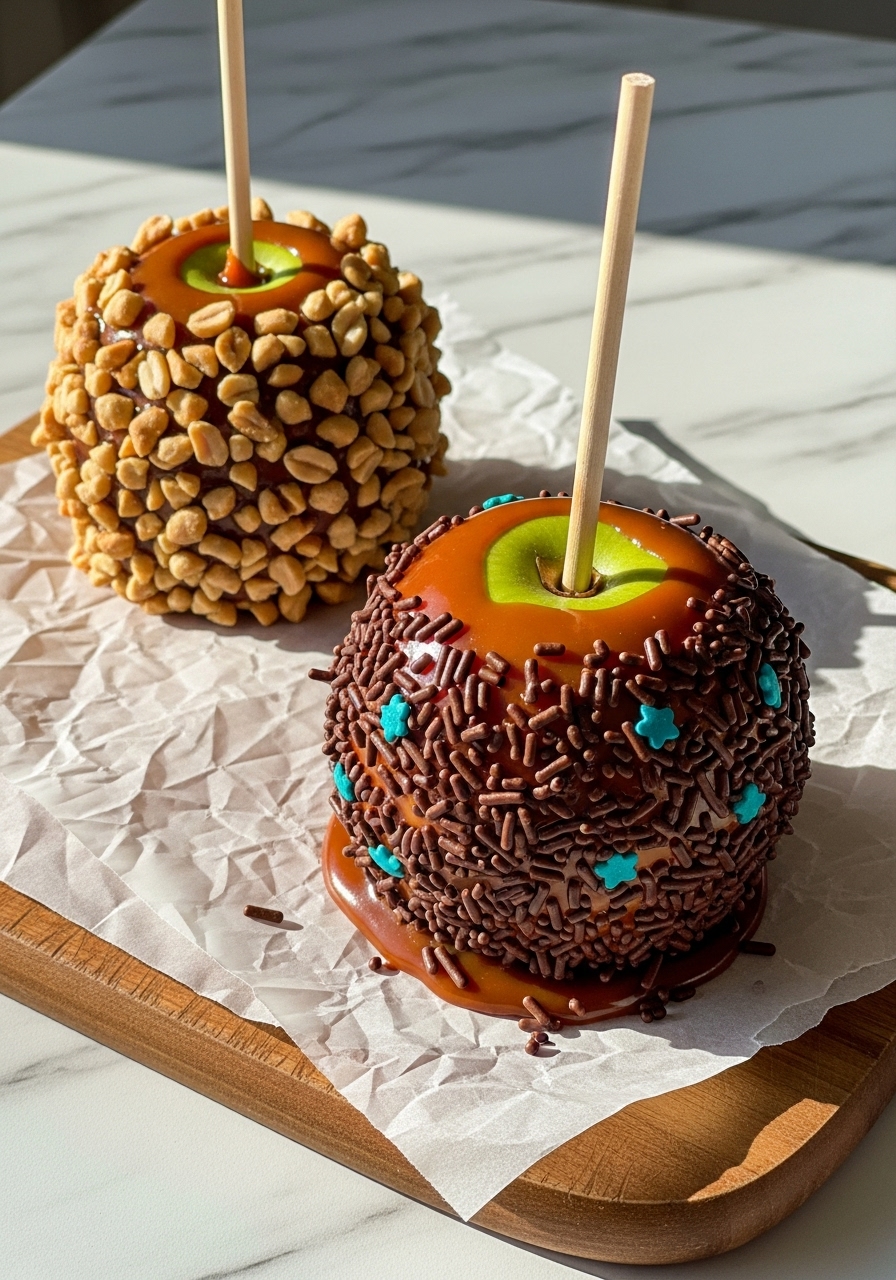
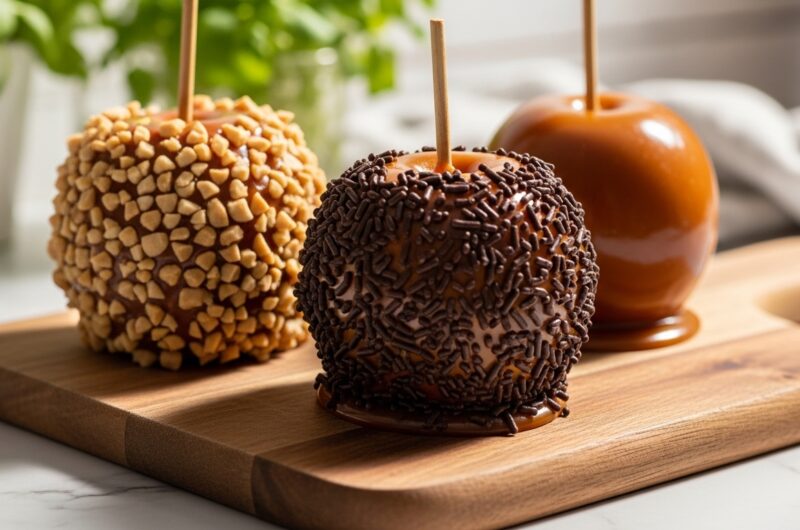
While classic caramel apples with peanuts or sprinkles are divine, don’t be afraid to get creative! You could drizzle them with melted dark or white chocolate for an extra layer of decadence. Crushed pretzels add a wonderful salty crunch, while mini chocolate chips or toasted coconut flakes offer different textures and flavors. For a truly gourmet experience, try rolling them in a mixture of chopped pecans and a touch of sea salt. Even a light dusting of cinnamon sugar mixed with finely chopped graham crackers can transform a simple caramel apple into a whole new dessert adventure.
Final Thoughts
Making caramel apples at home is more than just a recipe; it’s an experience. It’s the delightful mess, the anticipation as the caramel cools, and the pure joy of that first bite into a sticky, sweet, and tangy masterpiece. These homemade treats evoke a sense of warmth and tradition, perfect for sharing with loved ones or simply enjoying a quiet moment of fall indulgence. So, gather your apples, prepare your caramel, and get ready to create some deliciously memorable moments in your kitchen. Happy dipping, my friend!
Cozy Homemade Caramel Apples: A Sweet Fall Tradition!
Course: DinnerCuisine: AmericanDifficulty: Medium4
servings30
minutes40
minutes300
kcalIndulge in the nostalgic delight of homemade caramel apples, featuring crisp green apples coated in a luscious, chewy caramel and your favorite toppings like crunchy peanuts and chocolate sprinkles. Perfect for fall!
Ingredients
6 medium Granny Smith apples (or other firm, tart apples)
6 sturdy wooden sticks
1 cup (2 sticks) unsalted butter
2 cups packed light brown sugar
1 cup light corn syrup
1 (14 ounce) can sweetened condensed milk
1 teaspoon vanilla extract
1/2 teaspoon salt
1-2 cups chopped roasted peanuts, for topping
1 cup chocolate sprinkles, for topping
Directions
- Wash and thoroughly dry apples. Remove stems. Insert a wooden stick firmly into the stem end of each apple, pushing about halfway through.
- Prepare a baking sheet by lining it with parchment paper or a silicone mat. Set aside.
- In a large, heavy-bottomed saucepan, melt butter over medium heat. Stir in brown sugar, corn syrup, sweetened condensed milk, and salt. Bring to a boil, stirring constantly.
- Reduce heat to medium-low and continue to cook, stirring frequently, until the mixture reaches 245°F (118°C) on a candy thermometer. This is the firm-ball stage. This will take about 20-30 minutes.
- Remove from heat and stir in the vanilla extract. Allow the caramel to cool slightly for 5-10 minutes, stirring occasionally, until it thickens a bit and is easier to work with.
- Hold an apple by its stick and dip it into the warm caramel, tilting the saucepan and rotating the apple to coat evenly. Lift the apple and let any excess caramel drip off back into the pan.
- Immediately roll the caramel-coated apple in desired toppings (chopped peanuts, chocolate sprinkles), if using.
- Place the coated apple on the prepared baking sheet. Repeat with remaining apples and caramel.
- Allow caramel apples to set completely at room temperature for several hours or in the refrigerator for about 30 minutes until the caramel is firm. Serve and enjoy!
Notes
- Apple Prep Perfection: For the best caramel adhesion, make sure your apples are impeccably clean and completely dry. Any residual wax or moisture will make the caramel slip right off! You can even quickly dip them in boiling water for 10 seconds, then dry them thoroughly, to ensure a perfect grip.
- Temperature is Key: A candy thermometer is your best friend here! Reaching precisely 245°F (118°C) ensures your caramel will be perfectly chewy and not too hard or too runny. Don’t rush this step, and stir often to prevent scorching.
- Top It Off with Flair: While the caramel is still warm and sticky, roll your apples in your favorite toppings! From classic peanuts and colorful sprinkles to crushed cookies or a decadent chocolate drizzle, this is where you can truly make them your own. Don’t be shy with the toppings!