There’s something truly magical about transforming a simple pile of ripe fruit into vibrant, chewy homemade Fruit Leather Roll-Ups that instantly brings back childhood memories of those sticky, sweet treats. Let’s be honest though, store-bought versions often disappoint with their unpronounceable ingredients and excessive sugars, which is precisely where our kitchen adventure begins for a truly wholesome, deeply satisfying snack.
I still vividly recall the first time I made these: a scorching summer day with an overflowing fruit bowl just begging for a purpose beyond sitting on the counter. Instead of letting those berries go to waste, a spark of inspiration hit, resulting in perfectly pliable, naturally sweet sheets that tasted like pure concentrated summer joy.
The absolute best part is you don’t need any fancy equipment; if you have an oven and a baking sheet, you’re ready to create this kitchen magic, much like whipping up a batch of chewy homemade granola bars for another healthy snack. Get ready to rediscover the simple joy of real fruit in the most delightful way, free from mystery ingredients and full of pure delicious goodness!
Why You’ll Love This Homemade Fruit Leather Roll-Ups
These delightful Homemade Fruit Leather Roll-Ups are more than just a snack; they’re a little taste of home and health. You’ll adore them because they’re made with real, wholesome fruit, free from all those artificial nasties and excessive sugars found in store-bought options. It’s incredibly satisfying to know exactly what’s going into your family’s treats. Plus, they’re surprisingly easy to make, even for the most novice home cook, and are perfect for lunchboxes, road trips, or just a quick, naturally sweet bite. Imagine the smiles when you present these vibrant, chewy strips – pure fruit joy!
The Secret to Great Homemade Fruit Leather Roll-Ups
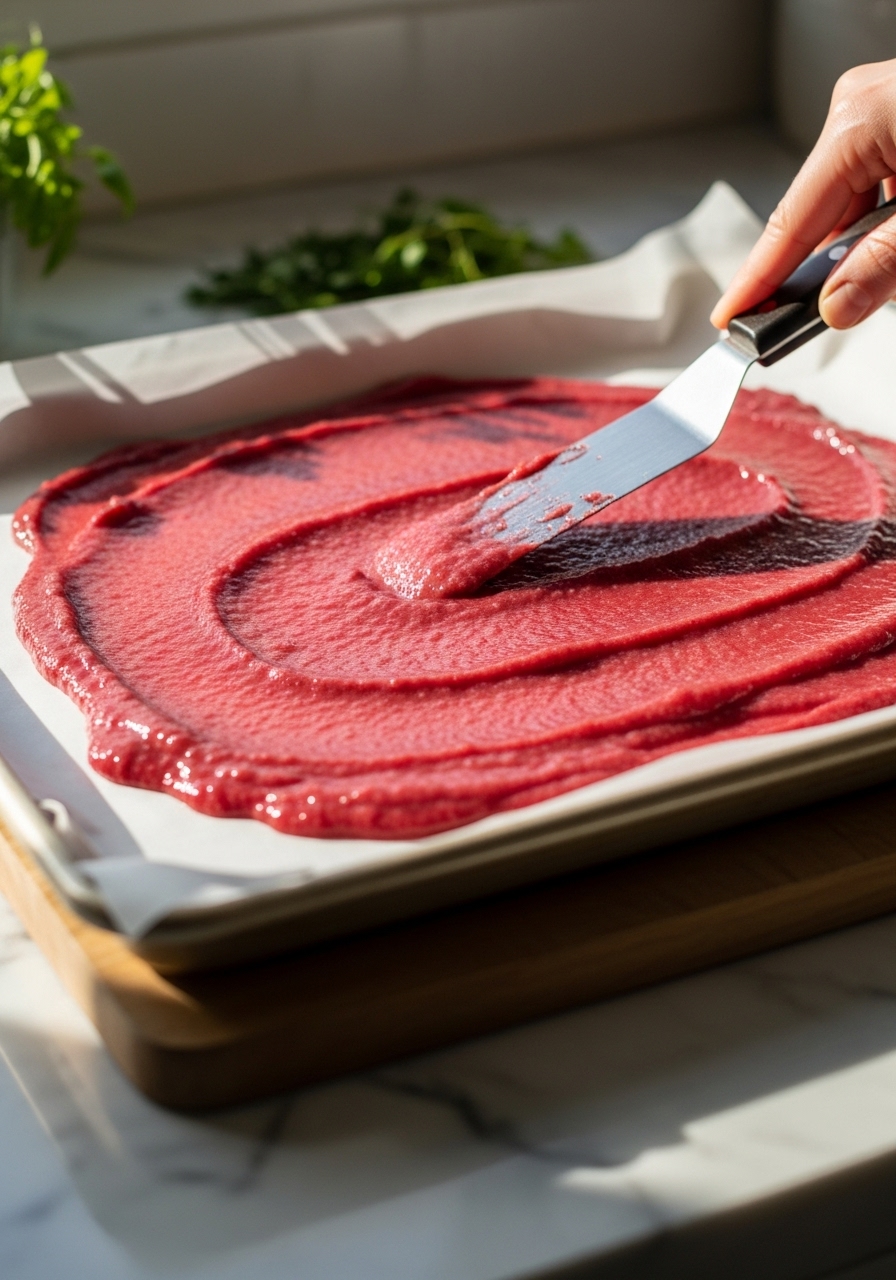
The real secret to achieving that perfect, pliable fruit leather texture without a dehydrator lies in a low and slow oven. You’re not baking the fruit; you’re gently evaporating the moisture. Patience is truly a virtue here! Spreading your fruit puree thinly and evenly is also crucial. A thick layer will take ages to dry and might end up gummy in the middle, while an uneven layer can lead to crispy edges and still-wet centers. Aim for about an eighth of an inch for consistency. And don’t forget a splash of lemon juice – it brightens the fruit’s flavor and helps prevent browning, keeping your fruit leather looking as delicious as it tastes.
Pro Tips to Nail It Every Time
First, for the ultimate flavor, always use really ripe Fruit Leather Roll-Ups. The riper the fruit, the sweeter and more intense your leather will be, minimizing the need for added sweeteners. Second, blending your fruit until absolutely smooth is key for a uniform texture; no one wants chunky fruit leather! If your fruit has seeds (like raspberries), a quick pass through a fine-mesh sieve will give you a silky smooth puree. Third, when spreading your puree onto the parchment paper, use an offset spatula or the back of a spoon to ensure an even thickness. And finally, keep an eye on it in the oven.
Every oven is different, so start checking earlier than the recipe suggests, and look for a surface that’s no longer sticky but still flexible. It should peel easily from the parchment when done.
Fun Variations to Try Fruit Leather Roll-Ups
Once you master the basic technique, the possibilities for Homemade Fruit Leather Roll-Ups are endless! For a tropical twist, try mango-pineapple or even a touch of shredded coconut blended in. Berry lovers can experiment with mixed berry, or a strawberry-rhubarb combo for a delightful tartness. Apple sauce can be a fantastic base for apple-cinnamon or apple-pear fruit leather, reminiscent of fall. You can also swirl two different purees together for a marbled effect before drying, adding a beautiful visual and a dual-flavor experience. Don’t be afraid to add a tiny pinch of spice, like cinnamon or ginger, to complement your chosen fruits!
Final Thoughts
Making Homemade Fruit Leather Roll-Ups is one of those kitchen projects that brings a deep sense of satisfaction. It’s simple, allows you to enjoy the natural goodness of fruit, and fills your home with the most wonderful, sweet aroma. There’s something so comforting about knowing you’ve created a wholesome snack from scratch, especially one that evokes such happy memories. So go on, raid that fruit bowl, get puréeing, and fill your pantry with these vibrant, chewy delights. You’re not just making a snack; you’re crafting a little piece of edible sunshine, full of love and flavor. Happy rolling!
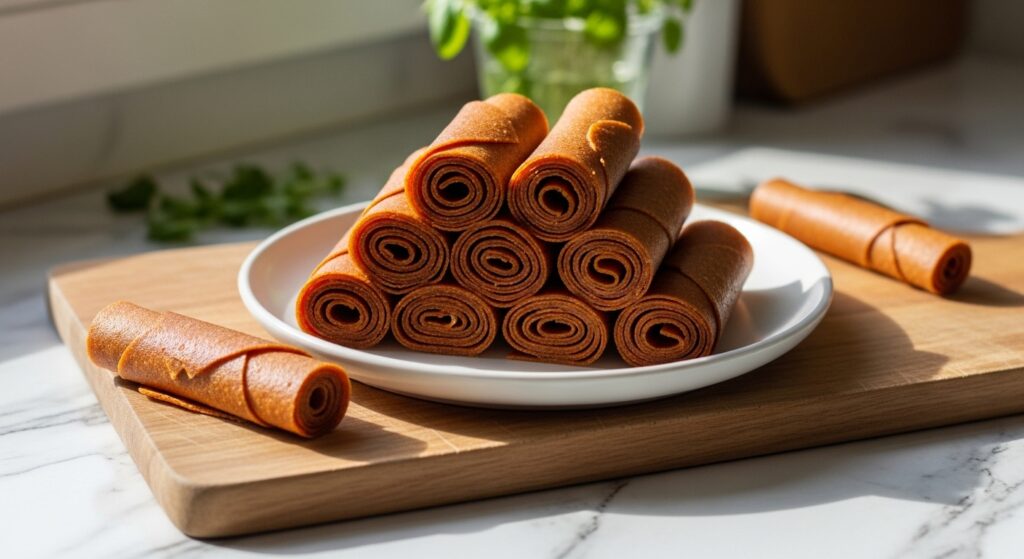
Homemade Fruit Leather Roll-Ups: Easy & Delicious!
Course: SnacksCuisine: AmericanDifficulty: Easy4
servings30
minutes40
minutes300
kcalWhip up these easy, homemade Fruit Leather Roll-Ups without any fancy equipment! A healthy, naturally sweet snack made with fresh fruit and baked low and slow in your oven. Perfect for kids and adults alike.
Ingredients
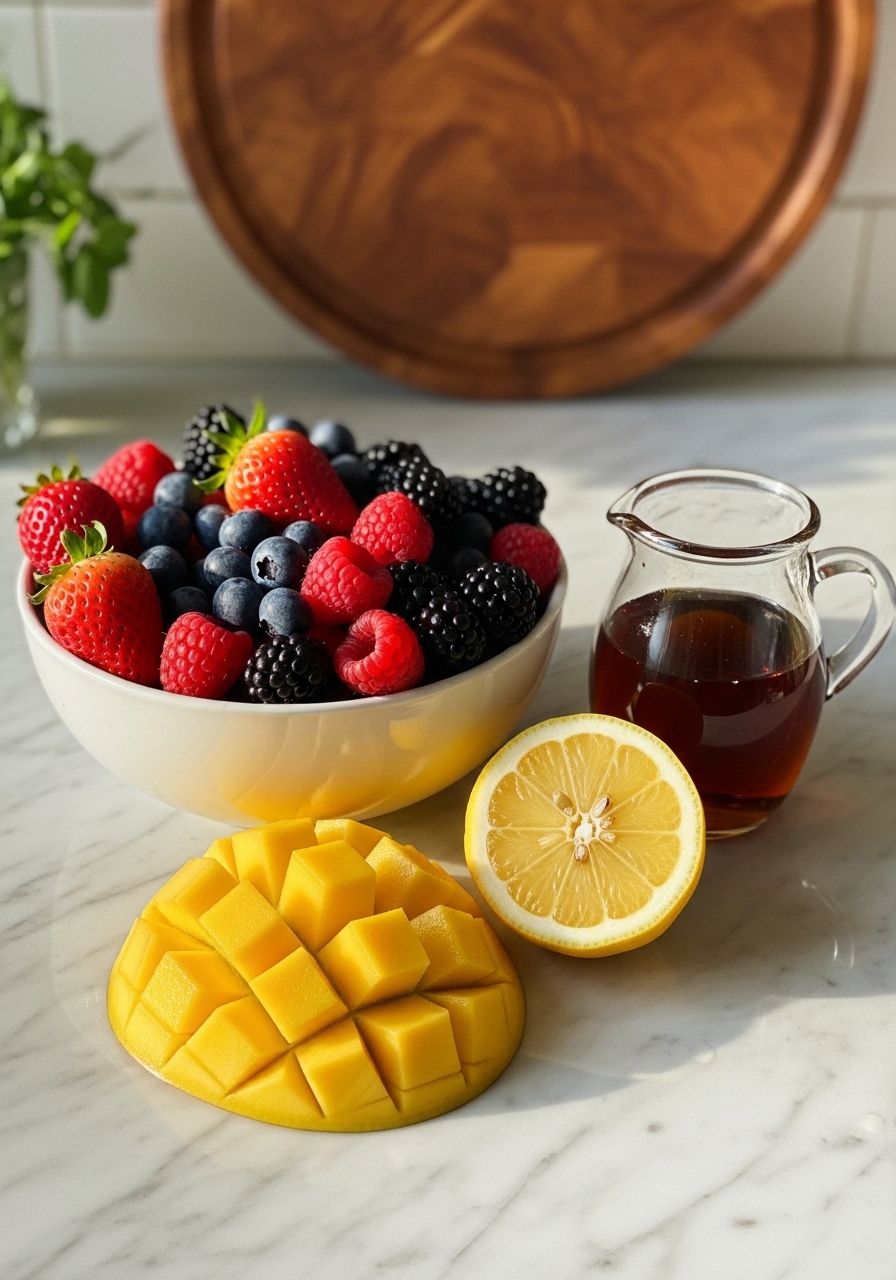
4 cups mixed fresh ripe fruit (berries, peaches, mango, apples, plums, etc.), stemmed, pitted, or peeled
1 tablespoon lemon juice (freshly squeezed preferred)
1-2 tablespoons honey or maple syrup (optional, adjust to fruit sweetness)
Directions
- Preheat your oven to the lowest setting, usually 150-170°F (65-75°C). Line a large baking sheet (about 13×18 inches or a half-sheet pan) with parchment paper, extending slightly over the edges. If you don’t have parchment paper, you can use a silicone baking mat.
- Wash and prepare your chosen fruit. For berries, simply rinse. For peaches, mangoes, or plums, peel, pit, and chop into chunks. For apples or pears, peel, core, and chop.
- Place the prepared fruit into a high-speed blender or food processor. Add the lemon juice and optional sweetener. Blend until completely smooth. If you desire a super smooth leather, you can pass the puree through a fine-mesh sieve to remove any seeds or small bits of skin.
- Pour the fruit puree onto the prepared baking sheet. Using an offset spatula or the back of a spoon, spread the puree evenly across the parchment paper, aiming for an even 1/8 to 1/4-inch thickness. Ensure the edges are not too thin, as they will dry faster.
- Carefully transfer the baking sheet to your preheated oven. Prop the oven door open slightly (about 1-2 inches) with a wooden spoon or heat-safe utensil. This allows moisture to escape and prevents the fruit from cooking instead of dehydrating.
- Bake for 3-5 hours, or until the fruit leather is no longer sticky to the touch and peels away easily from the parchment paper. The exact time will depend on your oven, the fruit’s water content, and the thickness of your puree. It should be pliable and leathery, not brittle.
- Once dry, remove the baking sheet from the oven and let the fruit leather cool completely on the pan. Cooling helps it firm up and become easier to handle.
- Once cool, peel the entire sheet of fruit leather off the parchment paper. Place the fruit leather, still on its parchment, onto a clean cutting board.
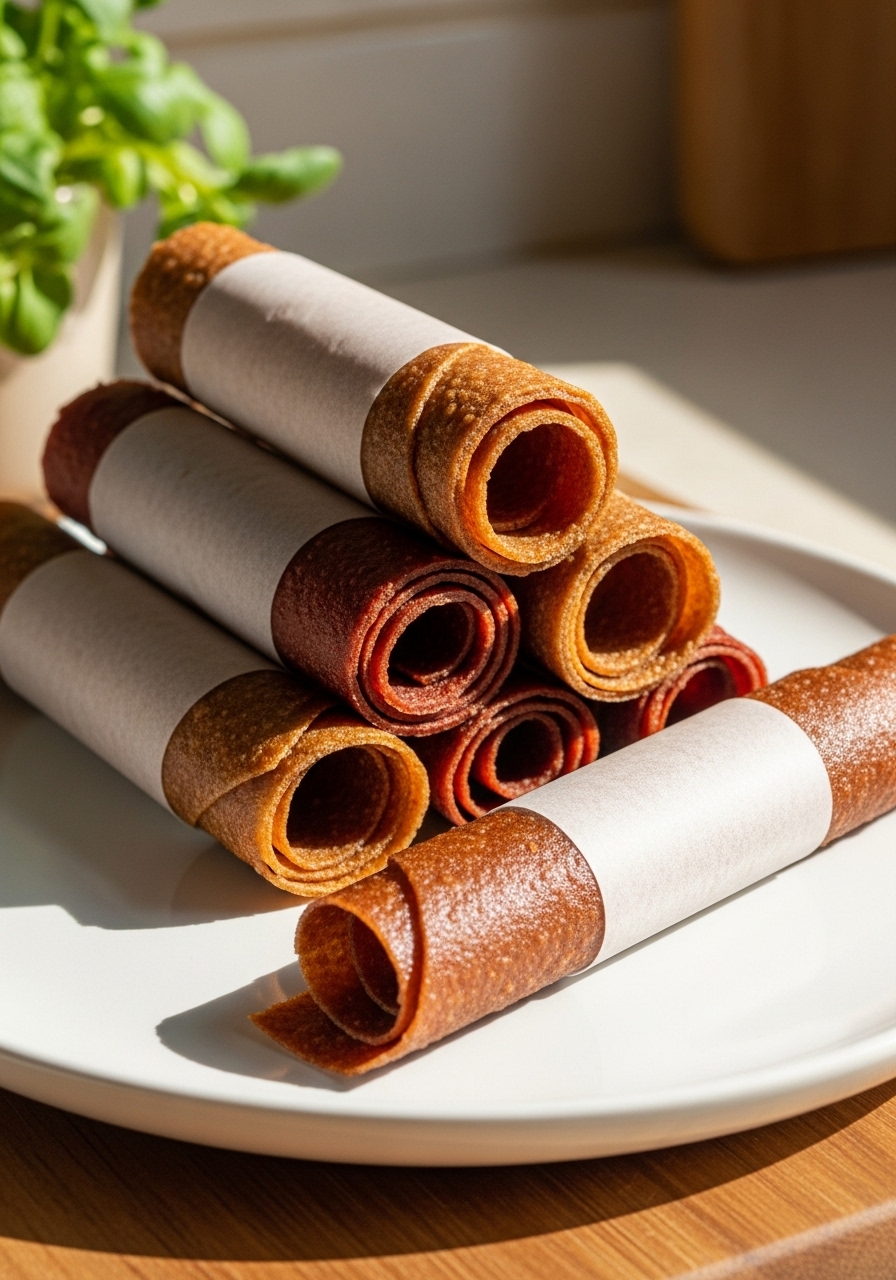
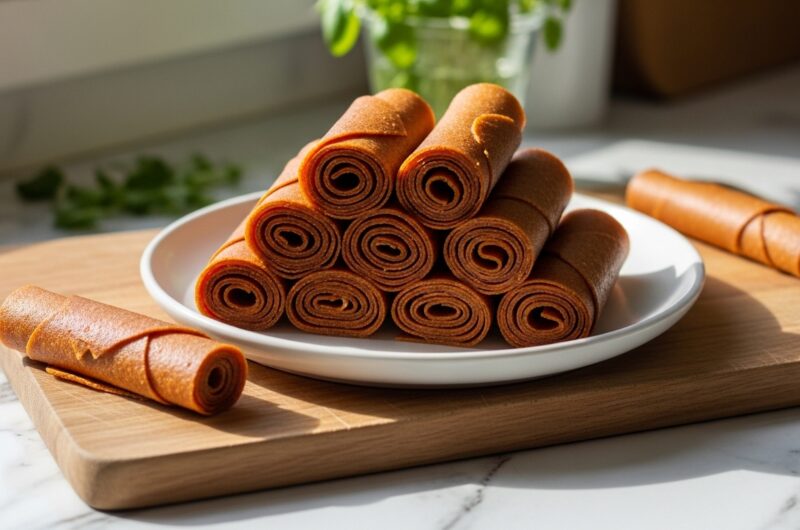
- Using kitchen shears or a pizza cutter, cut the fruit leather into strips, about 1-inch wide and 6-8 inches long. Roll each strip up with the parchment paper still attached. This prevents sticking.
- Store the rolled-up fruit leather in an airtight container at room temperature for up to 2 weeks, or in the refrigerator for up to 1 month. Enjoy your delicious, homemade snack!
Notes
- Fruit Choice Fun: The beauty of homemade fruit leather is the endless possibilities! Use a single fruit for a pure flavor, or get creative with combinations like strawberry-banana, apple-cinnamon, or even a mixed berry medley. Always choose very ripe fruit for the best natural sweetness and flavor concentration. If your fruit isn’t super sweet, feel free to add the optional honey or maple syrup to taste.
- Perfect Peel Trick: To ensure your fruit leather peels off the parchment effortlessly, make sure it’s dried thoroughly but not over-dried to the point of brittleness. If you’re having trouble, a slight chill in the refrigerator for 15-20 minutes can sometimes help it firm up enough to peel cleanly. If using a silicone mat, ensure it’s a good quality one that releases easily.
- Storage Savvy: Keep your precious Fruit Leather Roll-Ups fresh and pliable by storing them properly. Once rolled with the parchment paper, place them in an airtight container. If you anticipate storing them for more than a week, consider separating layers with extra parchment or wax paper to prevent any residual stickiness. They also freeze beautifully for longer storage – just thaw at room temperature when a craving strikes!