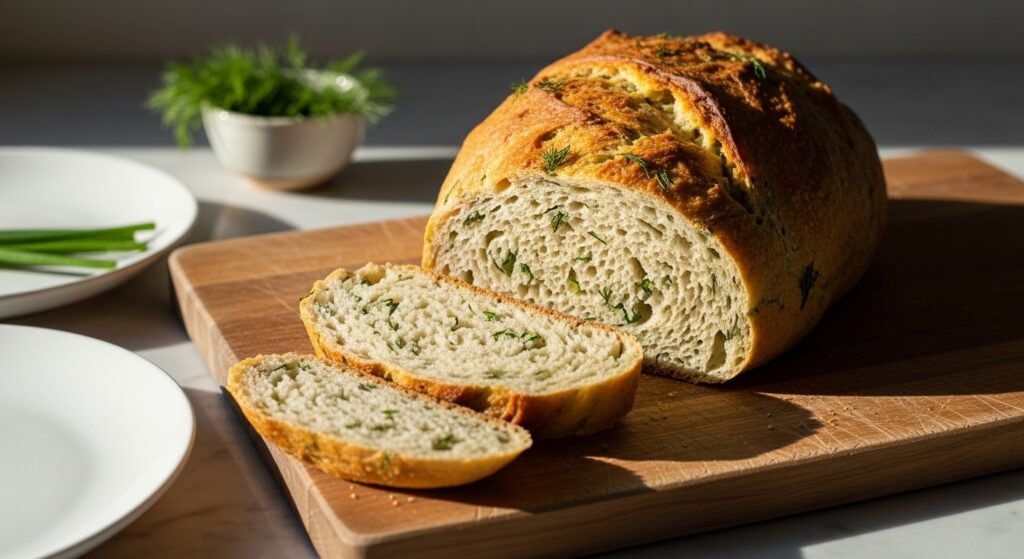
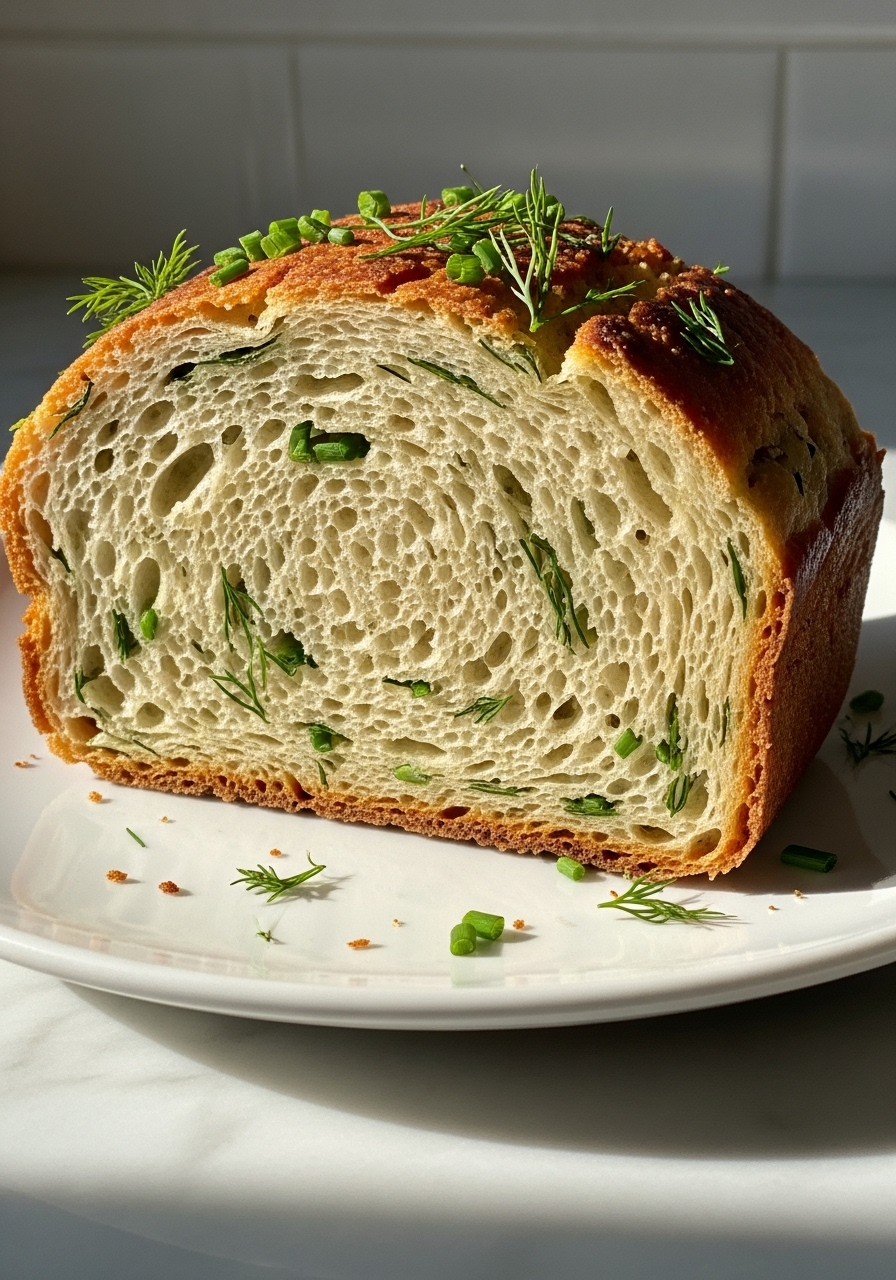
There’s an undeniable magic in the air when the comforting aroma of freshly baked bread begins to waft through your home, transforming an ordinary afternoon into something truly special. But imagine that magic infused with the vibrant, fresh tastes of spring – a symphony of bright dill and zesty chives! This Savory Herb Artisan Bread isn’t just any loaf; it’s a true culinary poem crafted to capture the essence of the season in every crusty, herbaceous slice.
I vividly remember the first time I perfected this exact combination for a casual spring brunch; the morning sun streamed through the east window, illuminating every speck of green herb flecked throughout the dough, and the sheer delight on my friends’ faces as they tore into the warm, fragrant slices was absolutely priceless. This recipe is surprisingly simple to master, yet yields a stunning, flavorful loaf that begs to be shared, much like other delightful savory herb artisan bread recipes you might explore for inspiration.
It’s about to become your new favorite way to celebrate spring gatherings, and for those exploring other artisan options, our fantastic gluten-free seeded bread recipe is also a must-try to get you ready to fall deeply in love with homemade bread!
Why You’ll Love This Savory Herb Artisan Bread
This savory herb artisan bread isn’t just another bread recipe; it’s an experience. The beauty lies in its simplicity and the incredible payoff of a rustic, crusty loaf that tastes like it came from a fancy bakery. It’s surprisingly forgiving, even for beginner bakers, and requires minimal hands-on time, making it perfect for a leisurely weekend project. The combination of fresh dill and chives sings of springtime, adding a delicate yet distinct flavor that complements almost any meal. Plus, the sheer joy of pulling a golden-brown, fragrant loaf from your oven is unparalleled, filling your home with an irresistible aroma that truly warms the soul.
The Secret to Great Savory Herb Artisan Bread
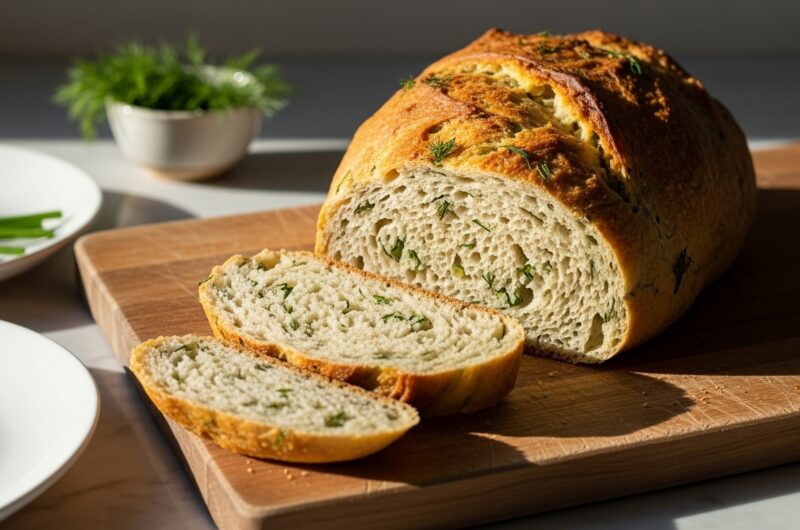
The real magic behind this incredible savory herb artisan bread lies in two things: time and temperature, especially when it comes to the bake. We’re going for that classic artisan texture – a chewy, airy interior with a crackling, substantial crust. The secret weapon here is often a Dutch oven. Baking the bread initially with the lid on creates a steamy environment that allows the crust to expand fully before it sets. This steam is crucial for developing that gorgeous, blistered crust you see in professional bakeries. Once the lid comes off, the direct heat finishes the job, giving you that deep golden hue and irresistible crunch. Don’t underestimate the power of a hot bake!
Pro Tips to Nail It Every Time
Achieving artisan bread perfection is easier than you think with a few insider tricks. Firstly, don’t over-flour your surface when shaping; a light touch keeps the dough from getting too stiff. If your dough is sticky, a little olive oil on your hands can help. Secondly, when scoring the loaf, be confident! A quick, deep slash helps the bread expand beautifully in the oven, giving it that characteristic rustic look. Lastly, let your bread cool completely on a wire rack before slicing. I know it’s hard, but slicing warm bread can make the crumb gummy. Patience is a virtue when it comes to the perfect artisan loaf, allowing the internal structure to set properly.
Fun Variations to Try
While the dill and chive combination in this savory herb artisan bread is simply divine, don’t hesitate to play around with other fresh herbs or additions! For a different seasonal twist, try incorporating finely chopped rosemary and a sprinkle of dried cranberries for a more autumnal feel. If you love a hint of spice, a pinch of red pepper flakes with some fresh oregano can add a lovely kick. You could also fold in some shredded Parmesan cheese or a handful of sun-dried tomatoes for extra richness. Think of this recipe as a beautiful canvas for your favorite flavors; the possibilities are endless for customizing your homemade artisan bread.
Final Thoughts
There’s an undeniable joy that comes from sharing something you’ve created with love in your own kitchen. This savory herb artisan bread, with its rustic charm and bursts of fresh flavor, embodies that perfectly. It’s more than just bread; it’s a centerpiece, a conversation starter, and a delicious reminder of the simple pleasures in life. Whether you’re serving it alongside a hearty stew, dipping it into olive oil, or simply enjoying a warm slice with a pat of butter, this dill and chive loaf is sure to become a cherished addition to your recipe repertoire. Go ahead, give it a try – your kitchen, and your taste buds, will thank you!
My Favorite Savory Herb Artisan Bread with Dill & Chives
Course: BreadCuisine: AmericanDifficulty: Easy4
servings30
minutes40
minutes300
kcalThis Savory Herb Artisan Bread is an aromatic, crusty loaf bursting with the fresh, vibrant flavors of dill and chives, perfect for spring gatherings.
Ingredients
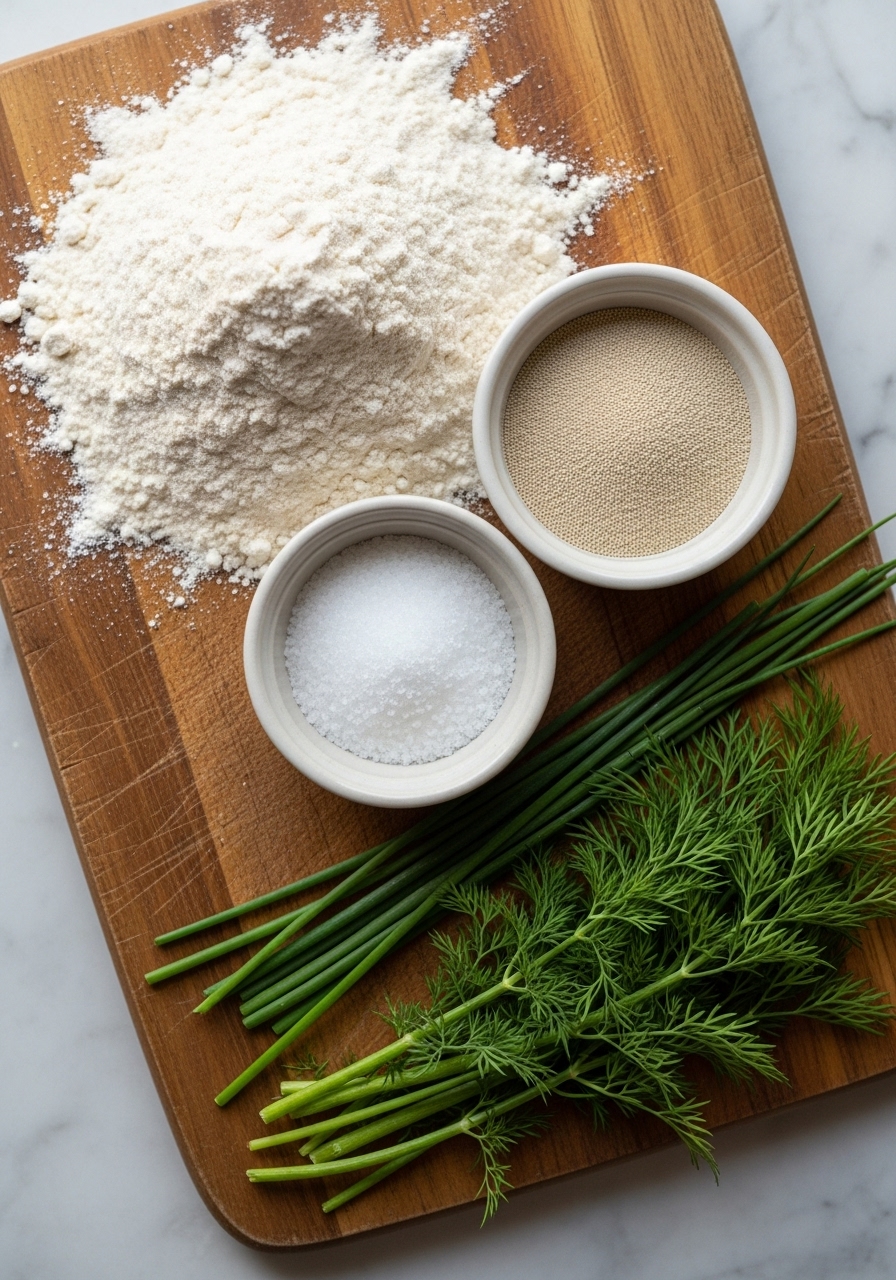
3 cups (360g) all-purpose flour, plus more for dusting
1 1/2 cups (360ml) warm water (around 105-115°F / 40-46°C)
1 teaspoon active dry yeast
1 teaspoon sea salt
1/4 cup fresh dill, finely chopped
1/4 cup fresh chives, finely chopped
1 tablespoon olive oil (for greasing bowl)
Optional: Pinch of flaky sea salt for topping
Directions
- In a large mixing bowl, combine the all-purpose flour, active dry yeast, and sea salt. Whisk briefly to combine.
- Add the warm water to the dry ingredients and mix with a wooden spoon or spatula until a shaggy, wet dough forms. Ensure there are no dry patches of flour.
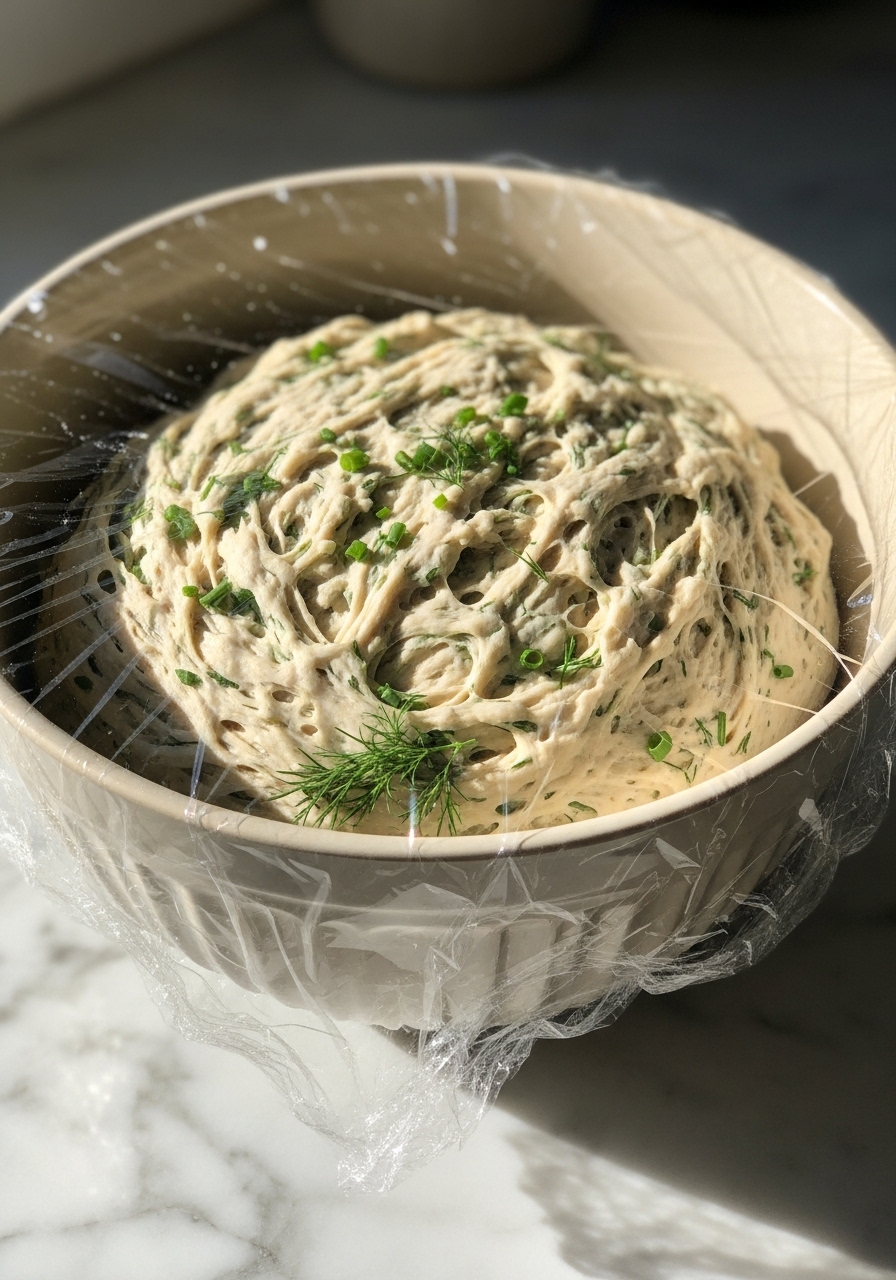
- Gently fold in the fresh dill and chives until they are evenly distributed throughout the dough.
- Lightly grease a clean large bowl with olive oil. Transfer the dough to the greased bowl, turning once to coat.
- Cover the bowl tightly with plastic wrap or a clean kitchen towel. Let the dough rise at room temperature (ideally 70-75°F / 21-24°C) for 2 to 3 hours, or until it has more than doubled in size and is bubbly.
- About 30 minutes before baking, place a 5-6 quart Dutch oven (with its lid) in your oven and preheat the oven to 450°F (230°C).
- Once the oven and Dutch oven are preheated, carefully remove the hot Dutch oven. Lightly flour a piece of parchment paper (about 12×12 inches) and gently turn the risen dough onto it.
- Gently shape the dough into a round loaf, tucking the edges under to create surface tension on top. Do not overwork the dough.
- Score the top of the loaf with a sharp knife or razor blade (a simple ‘X’ or a few parallel lines). This allows the bread to expand during baking.
- Using the parchment paper as a sling, carefully transfer the dough into the hot Dutch oven. Place the lid back on.
- Bake with the lid on for 30 minutes. Then, carefully remove the lid and continue baking for another 15-20 minutes, or until the crust is deeply golden brown and sounds hollow when tapped.
- Carefully remove the bread from the Dutch oven and transfer it to a wire rack to cool completely before slicing and serving. This allows the internal structure to set.
Notes
- The Perfect Rise: Don’t rush the proofing! A slow, cool proof often leads to a more flavorful and airy crumb. If your kitchen is chilly, find a cozy spot or use your oven with just the light on to create a warm environment.
- Herb Harmony: While dill and chives are a match made in heaven, feel free to experiment! Rosemary and thyme are lovely for a more earthy profile, or even a hint of garlic powder with parsley. Just remember, fresh herbs are always best here for maximum flavor and aroma!
- Crispy Crust Secret: A Dutch oven is truly your best friend for that amazing artisan crust. The steam it traps in the beginning of the bake creates a magical environment that helps the crust develop perfectly. If you don’t have one, a hot baking stone or heavy-duty baking sheet with a pan of water on the bottom rack can work wonders too.